Sunday, October 24, 2021

Another flurry of ideas

 A couple of months ago I was browsing through the several books written by Kim Brackett.  I drew several of them in EQ, printed them and them stuck them in a folder of Future Ideas.  And then forgot about them.  After working on a very intensive hand applique & embroidery quilt for several weeks, I needed a break.  So I pulled out my idea folder and started cutting, putting together seven kits that I could work on when I felt like piecing.  Well of course those kits just kept calling me and calling.  And now I've pieced all but a couple of them.  All in a row, kind of binge piecing.

For this pattern, called Scrap Basket blues, I wanted to try using some of my white novelty stash.  They don't seemed to get used very often, so I gave them a try.  The contrast isn't as good as I'd like.  It looks a bit of a muddle.  If I make this one again I'd use a white TOT instead, and I probably will as it was fun to sew.


Instead of mixing colors on this next quilt, I decided to make the center pinwheels in black novelties only.  But when I put the blocks together, the colors really did not standout as I had wanted.  So I played around with the sashing and borders to add some more punch.  I'm pleased with the final result, plus I got to use that rainbow fabric that I always seemed too bright on other quilts.


I was very intrigued with the pattern for this quilt, called Candy Canes.  It's one of those patterns that is much more complicated than it looks.  And what a fun result.


I've been calling this one Pez because it reminds me of those childhood candies.  It would make a great album quilt too.

And here is another candy quilt - I'm seeing a trend.  Three quilts with candy themes!  And very easy to piece.  The hardest part of this one was figuring out the layout so that the HST's had enough contrast between each half.  As you'll notice, there are tons of HST in all these patterns, resulting in a gallon sized bag of waste triangles.  I can't bring myself to throw them away, but they are pretty small, all cut from 2.5" strips.  Someday I might make another tiny triangle quilt - later....


These last two are ideas I got from MSQC's wonderful videos.  I really enjoy watching their videos, even though I don't always use their construction methods.  I modified this 1st one called Half-hexi links.  I decided I didn't like the large white spaces between the "wrenches".  A friend suggested that if I added hexagons they would look like bolts.  So I made the shapes using freezer paper and machine stitched them down - easy as could be.  And just in time for my boss's 2nd grandson - great timing.


This final quilt is called RicRac, and what a great fun pattern!  I did use the white novelties for this and it worked fine, perhaps because the areas were larger.  The original design uses 2.5" strips through out but instead I used a 4x6 block in the corner.  Frequently I will adjust patterns this way so that I can maximize the novelty fabrics.  I don't want to cut through the pictures any more than necessary.  I think this one needs a border but I can't decide exactly what - I don't want to detract from the pattern.  I need to think on it for a while.


In the meantime this top is hanging in the closet along with six others, waiting for me to get the quilting bug.  I'm committed to trying some new quilting patterns but I have three Christmas project  to finish first...It is almost the end of October already - YIKES!  I need to get busy.  


Sunday, August 29, 2021

Time to cull my stash

I have decided it is time to cull through my fabric - . The baskets I use as drawers are so full it is a struggle to put anything away.  I started with the novelty baskets - mostly because I have a clear idea of what I tend to use and what I don't.

I made 3 piles. First I pulled out all the small pieces (generally those less than FQ).  I was surprised how many of these had gotten lost between other fabrics. These will cut into 4.5" & 2.5" strips, squares & rectangles.   I know that almost all my I spy quilts are built using those sizes so it will save a lot of time pre-cutting these. I also pulled out those fabrics that I like but that I have had for a long time but that never seem to make it into a quilt.  Time to cut those up too as I've found if they are pre-cut I am more likely to use them. And then I made a pile of those fabrics that I just don't think I am likely to ever use. Many were inherited or gifted to me, but some where my purchases that just haven't ever gotten used or don't fit with how I quilt now. The result of this was I had a completely empty basket and each remaining drawer/basket actually had room - no more struggling to put fabrics away. Cool. 

I plan to take the "give away" bag to my next guild meeting - I 'm someone there will be able to use them.  I found a few fabrics in this stack that I didn't want to use in I spy quilts but that would make good binding, so I pulled those out. Also some yardage that will work as a border. Sometimes getting the fabrics out in the open helps to look at it differently. 


Now I had a large stack of fabrics to cut up. Ok, a VERY large stack. I spent two days cutting. Love using a new blade. 
I now have an entire drawer full (remember that empty drawer?) of precut strips that are 4.5 or 2.5 wide and at least 8" long - many are length of fabric so it will take a lot of quilts to use them up. These I can quickly cut into lengths needed for a particular quilt pattern - without the need to unfold & refold yardage. Folding is my least favorite part of quilting - especially as I only put one piece of each fabric in a quilt.  It can get very overwhelming.  Since these are already cut I will be more inclined to use them. I sorted them by size and color - aren't they pretty!  There at the top right corner you can see the bindings I made - I think there is enough for 4 or 5 quilts. 


This is the plastic drawer of 4.5 squares, 2.5 x 4.5 rectangles and 2.5 squares. I need to make some easy donation quilts from these - Trip around the world or rainbow diagonals maybe. But since no cutting is required, they go together very quickly.  But I do need to sort these by color too.  I may save that task for the next time my daughter is home - 😀


As I am cutting (fussy cutting and strip cutting) I keep anything smaller that 2.5 wide to make piano keys. And here is the result. Great for mindless sewing - I think that's what I'll work on next. There's definitely enough here to make several quilts worth of piano keys - either borders or entire quilts.


I've also saved all the tiny triangles - they now fill up a gallon size bag. I don't think I will ever use them - I've already made one tiny triangle quilt and doubt I'll do it again. But I have a friend who says she will give them a good home.

And here is the pile of little trimmings - kind of pretty.


Next I need to go through my TOT drawers. That's going to be harder. But there are definitely some fabrics that I inherited or been gifted that I don't want. And I know there are some small pieces that I keep glimpsing that I need to pull out. And then there is the scrap basket that has gotten out of control. I have gotten a couple of ideas from recent videos that I want to try that I'm going to pull from scraps. Plenty to keep me busy for a good long time.

Saturday, July 10, 2021

Not novelty but long time projects that deserve some acknowledgement

I wanted to share these are two applique projects that have been MANY years in the making - or should I say completing.

This first was started in December 2016.  The pattern is Rose window by Eye of the beholder quilts.  I had made a table runner from one of their patterns several years ago and really enjoyed the reverse applique method.  It is constructed where the pattern outline is basted.  Then gradually you cut away the fabric and needle turn under the edge while removing small sections of the basting.  This makes it very portable and easy to work on while traveling.  I started it on a skiing trip to New Mexico with my family.  The applique was finished  in late 2020, then I hand quilted outlining the applique and a simple grid.  I wasn't sure exactly how to finish - it needed something special.  So I asked for suggestions from some quilting friends.  They suggested a corded looped binding.  Hmmm, I had seen those finishes at quilt shows but never attempted one.  So I search the internet, found some blog posts about how others had done it and decided to give it a try.  It wasn't as difficult as it looks, but I doubt I'll ever try one again.  I was definitely glad it was a small piece.  It looks great on my mothers round coffee table in our living room, I am very proud of how it turned out.  


The second quilt was started in 2012.  I wanted a take along project when my daughter and I went to Canada - a trip to celebrate her 21st and my 40th birthday.  The pattern is Fiesta de Talevera designed by J. Michelle Watts who is from Roswell, NM.  I loved the pattern as it reminded me of our time living in Santa Fe where the Talevera style tiles are everywhere.  The pattern has 12 blocks.  But after finishing 4 of them I realized how repetitive they were and decided I didn't want to do any more.  Instead I modified the border blocks to make a corner design and made a medallion layout instead.  The question then was how to quilt it.  I felt I had spent sooooo long on the applique but my quilting skills are pretty basic.  So I packed it away.  Then about a year ago I was visiting with some quilt friends about how many unfinished quilts each of us had.  I mentioned this applique and a friend who does amazing custom quilting said she would like to quilt it for me.  I knew I could trust her to take a good quilt and make it amazing.  I was not disappointed.  It now hangs in the place of honor in my sewing room.


some details of the quilting:


Some Summertime Ideas

 As I'm sure I've mentioned before, ideas of novelty quilts seem to come in bunches.  Discovering that one of my favorite pattern designers had a couple of books I had missed got my creative engines going again.  I discussed the fun secondary designs in my last blog post.  Here are those two finished tops along with a couple of others.  

This pattern is called Windmills from Kim Brackett's book Scrap-Basket Strips and Squares.  The hardest part of this quilt was remembering which corner to put the white triangle.  I have 4 blocks that spin the wrong say in my scrap basket now.  I tried constructing that corner triangle a little differently than I usually do.  Rather than sewing on the triangle then trimming the waste from the rectangle, I trimmed the small triangle away first.  Then I sewed the white triangle using a 1/4" seam on the bias.  It worked pretty well as long as I remembered to cut all the rectangles with the right side up.  My windmills spin the opposite way from the book because I cut from the backside.  Oh well.  A good reminder that rectangles are NOT reversible.  The layout was very critical on this one.  I'm proud to say I only had to resew one block.  My numbered flannel flags were lifesavers.


This quilt, also from the same book, had a similar challenge  - you have to sew those triangles on the same corners EVERY TIME.  But by this time I was paying attention and put a sample block right in front of my machine as a reminder.  Since the color placement was random, this quilt went together very fast.  I did put them up on the wall and try to scatter the different colors - planned random.


This quilt is from another one of Kim Brackett's books, Scrap-basket surprises.    Initially I was going to use black in the corners but it felt like the contrast was too harsh, so I used a dark gray tone on tone instead.


This pattern also uses 2" strips and 2" squares, but the pattern is by Cluck Cluck sew, called Shortcake #122.  It was fun to use up a bunch of left over squares in the 9 patch section.


None of these have borders yet.  They are hanging in the closet aging a bit until I know what I'm going to do with them.

This last one isn't a novelty quilt, but since I've been running on about Kim Brackett, it seems appropriate to put it here.  This is another of her patterns from Scrap-basket surprises, called Bali Sea Star.  I had decided to use up some of the pre-cut 2.5" strips I had in my stash.  This quilt officially used up the last of the black & white strips given to me by my cousin (I think this is the 3rd quilt I've used them).  The bright strips were a door prize from the AZ retreat from years ago.  This quilt is for me, just for fun.  And I did enjoy it, except for how badly those strips had raveled after being handled so much for years.  

I was especially pleased with how the binding turned out - I've had this fabric in my stash for years and it fit perfectly for this quilt.


Fun with Secondary patterns

One of the things that I love most about quilting is the secondary patterns that frequently result when putting together simple blocks.  I think that's why I love Kim Brackett's books so much, so many of the blocks are ridiculously simple but result in wonderful secondary patterns.  I just recently bought my 3rd & 4th copies of her books and decided to draft a couple in EQ.  Such simple blocks, but look at the magic that happens when you put them together!  Both of these are from her Scrap-Basket Strips and Squares book.

The block is very simple.  And I'll be able to use some of those waste triangles left from previous projects for the white corners.


Here is the full quilt drawn in EQ.  This one will take some effort to keep the colors in the right places.  I'm still figuring out how to get organized.  The pattern is called Windmills.  Cutting is very fast but putting it together is going to take some thought.  Also normally when I use waste triangles I draw the sewing line on the back of the squared fabric to help me align the triangle.  But I think I may trim the block corner instead with a quarter inch seam and save some time.  I'm going to try that on a few and see how it works.


Here is another block from the same book- very simple.  And I can use some waste triangles from other projects.

And here is what it looks like drawn in EQ.  Since this one is scrappy, the colors can go where ever they end up.  It kind of reminds me of woven candies.  It took me a bit to figure out the blocks on this one, but when I saw how she had done it, I laughed at how simple the block is.


  Such fun.  I'm cutting out strips now for these two and a couple of others.  Stay tuned for the finished tops.

Sunday, April 11, 2021

Catching all the remaining missed quilts

As mentioned previously I have been going through my excel list of quilts and there are a handful I have never posted about.  Some I didn't take pictures of.  Some are duplicates of previous patterns so really not point in posting (I've made several floating blocks and they all look about the same).  And others just never made it into a post yet.  So in the interest of making this blog a complete reference - here they are.

This is based on the traditional jewel box pattern and used up a bunch of scraps.  The quilt was done in 2012 as a donation quilt.  I need to give this one a try again once I have enough large triangles in the scraps.


I'm surprised I missed posting on this one.  It's called Floating Novelties.  It was a fun quilt to do.  I always enjoy grouping fabrics by color and this one is pretty flashy.  It looks difficult but is actually pretty easy to piece.


This quilt was also done as a donation and specifically to use up some of the pink novelties and fabrics that never seemed to get used out of my stash.  I'm sure a little girl who loves pink loved the quilt - I however wasn't too excited about it. 
 

The pattern for this was called Wild thing by Barbara Groves.  I made a rainbow version a couple of years ago - it is another good way to use up triangles.  Made in 2006 for the daughter of my boss at the time, her favorite color was purple, so I used purple tone on tone fabrics.  

This quilt was one of my first experiments.  I didn't yet know that puffy batting wasn't a good idea and that satin binding was an even worse one.  Even the colors didn't work well.  Ugh. I've learned a lot since 2005.

This quilt idea came from a demonstration I saw several years ago at the AZ quilt retreat, presented by Quilter's lumberyard.  It has some great large blocks but is a bit more complicated due some a few partial seams.  If I make this again I think I'll make the little friendship star around the square in a different color to make the secondary pattern stand out.

I call this one Colorblock.  It uses a combination of 2" & 4" squares.  I completed this one in 2015.  Sometimes I used the same fabric in the 2" squares, but sometimes it is a coordinating fabric - when I could find one that read the same.

This is another Quilter's lumberyard idea called ladders.  It is a great way to use up 2 x 4 rectangles or even piano keys.

I've made this pattern once before, called When I'm 64.  But this version uses only cat fabrics.  I was given a large stack of cat squares and was having trouble using them up as I try not to repeat pictures in my kid quilts  So I decided to put the all cats in one quilt for a co-worker who owned several cats.  Not sure why the pattern was called that, there are only 50 large squares and a lot more small squares.  But it definitely helped use up some of those cat squares.

This last one was a family joke, made for my son.  [He decided to get a tattoo on his leg and thought he had chosen sharks, which was one of his favorite toys as a kid.  But the tattoo turned out to be Koi fish.  I had fabrics for both in my stash, so I made this for him the following Christmas.  Just to help him tell the difference.


Well I think that gets everything caught up and organized.  It is always interesting looking back through older quilts, seeing how my quilts and skills have changed through the years.

Novelty but not quilts

 I also recently realized I never posted a couple of novelty fabric projects that weren't technically quilts but were still very fun to make.

This soft book was inspired by a blog post by Crafty Staci - linked here quiet-book-of-colors.  Great idea & instructions.  I had purchased a book several years ago with instructions for fabric books that used novelty fabrics but never did make one.  Then I ran across this blog post which was so simple and straight forward.  So I got busy and really enjoyed making it.  

This was made for a friend of my daughter last year for her baby shower (along with a quilt).  Here is the finished cover, which just features a 9 patch showing the 9 colors in the book in tone on tone fabrics.


And here are the 10 pages, one for each color plus a multi-colored page and the back and front covers.  This is before they were sewn together.


I thought it was especially appropriate as the new mom is an art teacher.  It was a fun project, fun to pick out the best fabrics to represent each color.

I also made a two I spy travel games for twin little boys who had joined our church.  They were too old for quilts but thought they might enjoy the fabrics presented as a game.  Momma gave me some ideas of things they were currently interested in and I went hunting through my stash.  I didn't take photos of the games as they weren't particularly pretty (the pictures were the point) but the idea is a very quick and easy one.  If/when I make them again I need to take pictures.  Here is the link to the blog post by Stitched by Crystal- i-spy-toddler-travel-game

This last idea I have not yet made as I think it will take significant time - I will likely do it for someone extra special - perhaps my own someday grandchild (sigh).  Really fun idea though, using a fabric featuring the letter of the alphabet in the shape of the letter itself.  The idea came from a post I saw on Facebook - I don't know this individual, she just posted on a group I was following.  Such a great idea.  I'm guessing she found it somewhere but she didn't reference the source in her post.


I missed one!

Not sure how but I missed posting about this quilt.  Kind of surprising because I remember spending a lot of time figuring out how to do it.  I think I finished the quilt about the same time I started this blog, so it likely got lost in the shuffle.  I was recently looking through the excel file I keep of my various quilts and blog posts (yes I'm an accountant) and realized I never posted this one.  So here it goes.

This quilt was made for my boss's 1st grandchild in October 2014.  She now has 3 grandkids, all who have their own quilts and she tells me they still love them and play with them, consider them special.  Which is so sweet to hear.

The idea was for this quilt was the pattern Urban Abacus by Sew Kind of Wonderful - I saw several quilts made using this pattern at the Dallas quilt show that year, all made in "contemporary" colors - gray and pastels - bleck.  I didn't want to purchase a special ruler to cut the arc but a friend gave me an extra long arm ruler that I was able to use.  It was fun to be able to use large prints and not have lots of seams.  I struggled with what to make the "strings" out of, settled on a striped fabric that I had previously used for borders.


It turned out well, but I think this one falls in the probably not again list of patterns.  Looking at it now, I should have made the strings narrower and it needs a contrasting inner border.  But Kennedy doesn't mind.  Several months ago her grandma showed me a video of her & her little sister comparing their quilts and finding matching fabrics, getting so excited.  Made me grin from ear to ear.  Sigh.  And that is one of the reasons I keep making these things, imaging little people getting joy and comfort from something I enjoyed making.

Borders and bindings

One more post related to my recent finishing ten I spy quilts.  Many times I will make a top but not add borders or quilt it until I know what I am going to do with it.  On occasion I have wanted to make it bigger for an older child and so will make the borders larger.  But this time I wanted to finish all the tops I had made (plus one I found in the closet).  So I was adding borders, quilting and binding all 10 at the same time.  Just to mix things up a bit I tries some different things.

This border & binding is pretty typical of what I usually use.  A bright narrow inner border (1" wide) with a dark patterned wide border of 2.5" and a binding from the same fabric.  I like this on quilts where I want the pattern of the quilt to be the center of attention and the borders to act like a picture frame & mat.

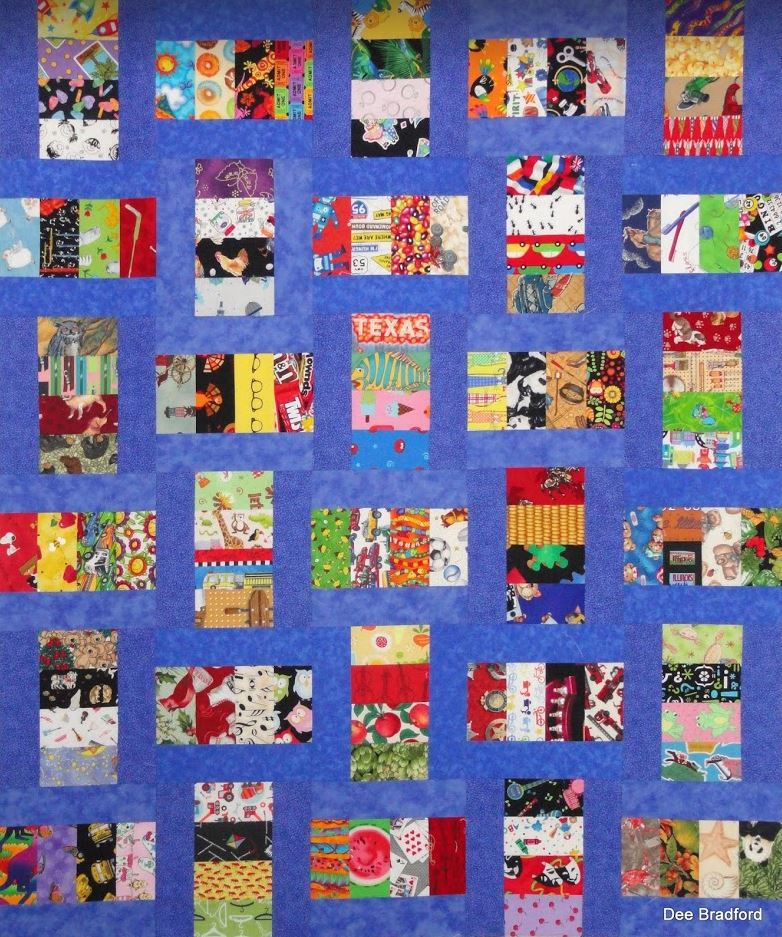
On this I had added a pieced inner border to make the quilt larger and made the outside border from the same fabric as the corner stones in the quilt.  But I didn't have enough for the binding.  I decided to use a nice black with larger polka dots.  It doesn't fight with the busy border at all, kind of fades into the background. I had purchased the fabric thinking to use it for narrow inner borders but it works pretty well for bindings too - I may have to go back by Hobby lobby to get more.  I have a feeling I'll use this one frequently and I only got 2 yards.  


For this quilt I liked a green inner border and I used the last of the fabric with those little scattered squares (the reason I didn't have enough for binding the previous quilt).  I didn't want to use the black dots again for the binding - and definitely didn't want green so what else would work?


I had this rainbow loops fabric that I have purchased for borders many MANY years ago but it never seemed to work on any of the quilts I tried it with - always too busy or something.  It had been in my stash for at least 8 years (I know it was at least that long because I did use a little of it on a T-shirt quilt).  I decided it was time to use it and so I cut it all up for binding. It works pretty well on the quilt - a bit crazier than the black with polka dots but since the quilt itself has a lot of calm white background I think it will be ok.  

Here's a bigger pic of the loops.

Since I was "using up" old fabric, I pulled out this one too.  I actually was given this fabric by a coworker when her mother died - since I have not worked with her for 12 years that gives you an idea how long it has been in my stash.


But see how well it works on this quilt - it sets off the simple pattern  and makes the novelties sparkle.  I like that it reads more as a color of it's own instead of the black multi that I frequently use.  


This string quilt was looking a little calm with the chambray border/sashing so I gave it the rainbow loops binding and it really set it off great, a perfect use of that wild fabric.


After adding this border fabric I realized I was getting pretty low on this fabric and wanted to save it for another quilt.  So I used the remainder of the blue/purple binding instead.  I wish it was a better match for the blue inner border but it's such a busy quilt I think I'm probably overthinking it.  Certainly not worth replacing the inner border.


This border I struggled what to use for binding also, but I had some notes binding left from another quilt, so I made a bit more and added it.  The colors work and it's so narrow I don't think anyone will notes I mixed alphabet & music notes.


After adding all these borders I got nervous that I was getting low on border fabric so I went by Hobby Lobby to see if they still had either of the numbers/letter fabrics I had gotten last summer.  Of course they didn't - but they did have some great fireworks fabric.  I had previously purchased some of this to use in the novelty quilts (for eXplosions - haha) but decided it might work well for borders too.  So I bought 2 more yards.   Certainly it is bright enough.  I also purchased 2 yards of the black with dots for the narrow border.  The dots are larger than what I've used in background before, I like that you can really see the colors of the dots.  On this I didn't want more contrast so I made the binding from the same fabric as the border.


I like how it sets off this quilt with so much white background.  It balances it will without overpowering.


This next quilt had me stumped for a while.  I really liked how it turned out but everything I tried as a border just didn't work right.  They all seemed to distract from the fun rainbow wave pattern.


Finally I decided to just add a binding with no border but make it a bit wider than my usual 2.5".  I had just a bit of this striped fabric left in my stash and cut it straight of grain so the stripes would be perpendicular to the quilt. 


This is another one of those fabrics that I have used in several I spy (and T-shirt) quilts over the years.  Joann fabrics carried this along with a coordinating black background with scattered multi dots for several years and I used them a lot.  But no more - they are both gone now. Part of quilting is using things up, even favorite fabrics.  I'm sure I'll find new favorites.