Monday, May 20, 2019

Some inspiration

The last two years I've gotten interested in projects that have taken all my time (new quilting machine, Empire Place, bags, t-shirt quilts, etc.  The result is I've been neglecting my novelty stash - 2 novelty quilts in 2 years and  of those only needed a border!  I am astounded and kind of ashamed.  One of the side benefits of this blog, I can see just how long it's been since I made the last quilt.  The scary part is it doesn't seem that long.  Time really does start going by faster as you get older.  So now I've resolved to sew up some of my stash.  I want to shared these fabrics, not hoard them in my baskets.  I'm pretty sure I have a SABLE - stash acquired beyond life expectancy.

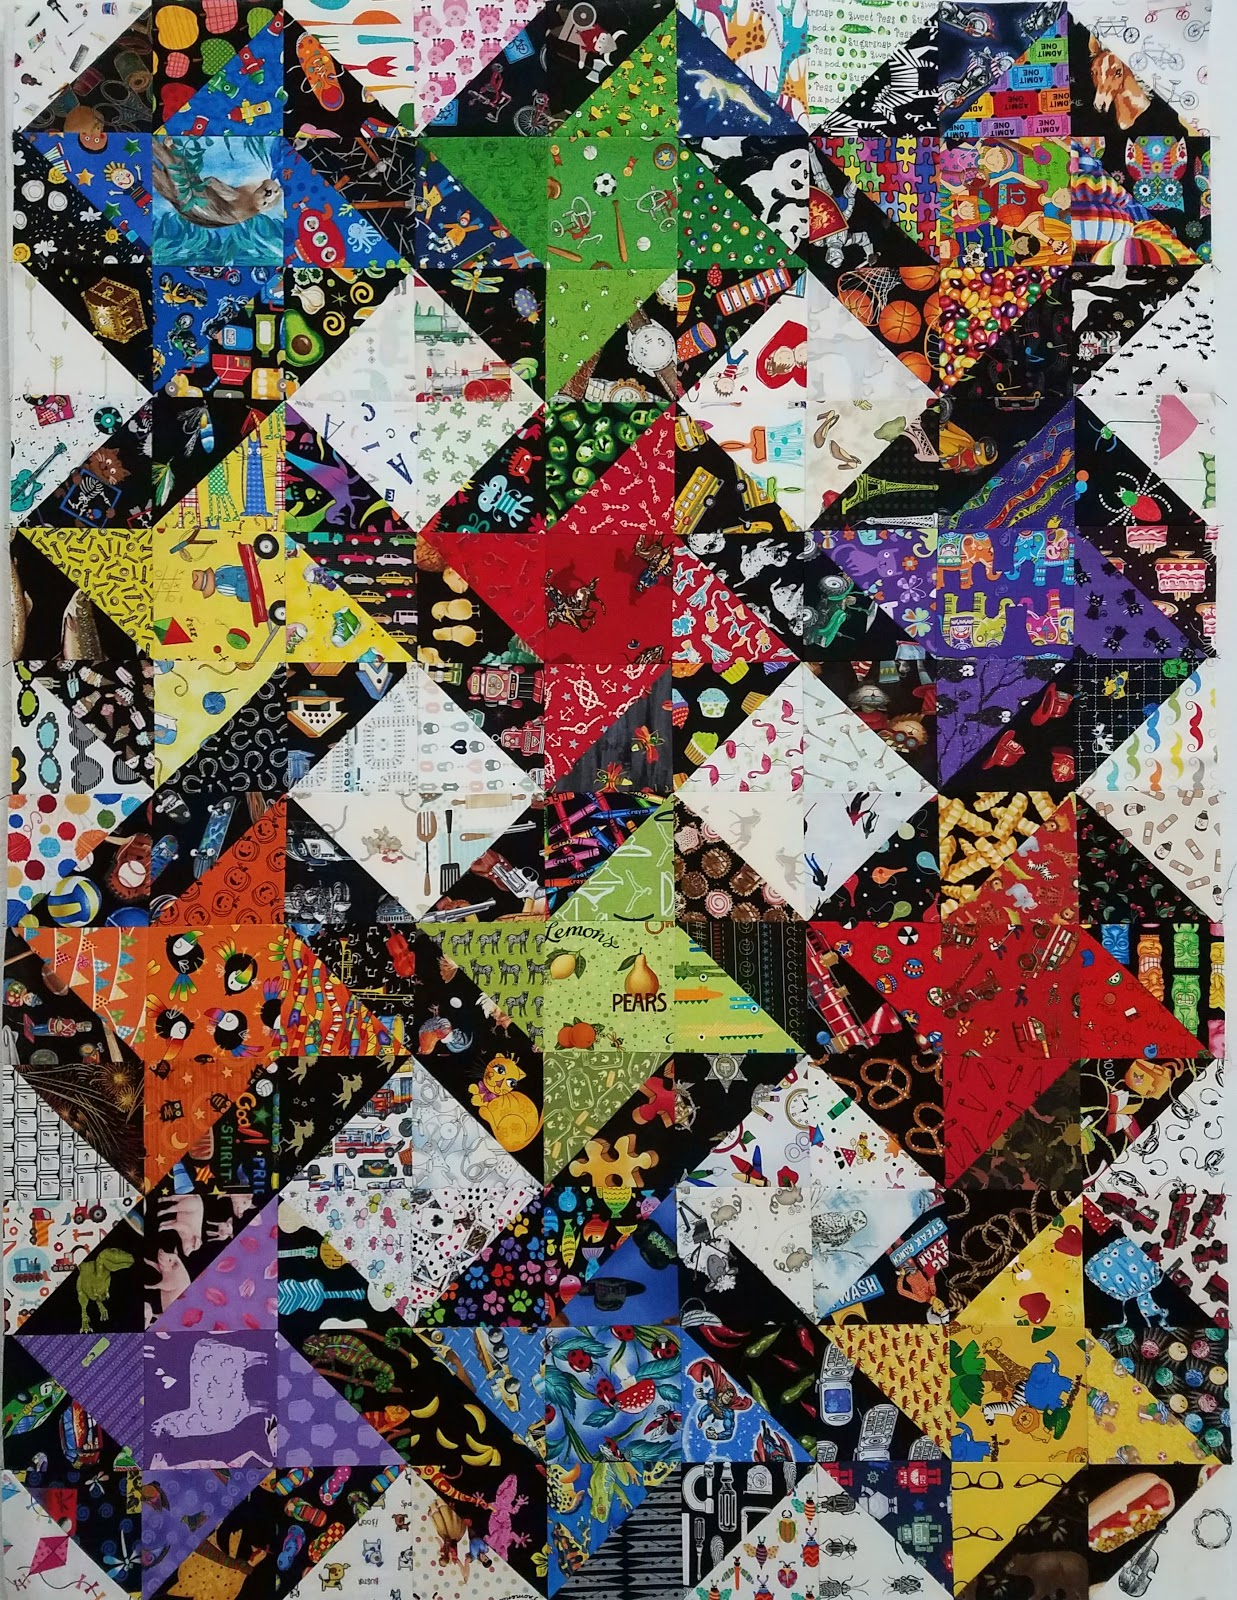
So once again I went scanning through my old photos from quilt shows, old catalogs, pins on the internet for inspiration.  And here is the result.

This modified Friendship star was challenging.  The inspiration was from a FB post by Quilting Digest.  The piecing is easy, just HST and 4" blocks.  But figuring out how to lay it out was not easy.  I drew it out first on grid paper, to get the basic idea, then just starting putting the pieces on my wall.  I used my felt row/column tags and am proud to say I did not have to rip anything out.  This quilt was made entirely of the precut squares I had been keeping (except for the background).  I've realized I'm really not using the precut squares much any more.  Most of my quilts seem to have different sizes fussy cut from my stash so I'm going to use up those precuts.  These squares are actually 3.5" finished  - I cut the 4.5" diagonally to make the HST, then trimmed the HST down to 4".
Interlocking Friendship star - idea from Quilting Digest
 The inspiration for Radiant came from 2 places.  First the internet, which I then snipped and put in my OneNote idea notebook.  I later took a picture of one at the Dallas Quilt show and put it in my notebook.  I didn't realize I had double marked it until I was looking through my notebook for ideas.  There it was twice - how about that.  So I tried making one and it was pretty fun.  I did not want to use black for the small centers because so much of my novelty stash is dark fabric, so I decided to use yellow.  At first I was using novelty yellows, but that was too busy - the yellow got lost.  So I replaced the novelties with a small dotted yellow.  This block is made with 2 simple blocks which are then cut diagonally and sewn back to the other block - making matching pairs.  I love the optical illusion of the diamond.  I'd definitely be making this one again.
Radiant by Cozy Quilt Designs

This Kaleidoscope quilt is one of those that I give a qualified review.  It honestly would be a much prettier quilt without the novelties - they are distracting.  But it was an enjoyable quilt to make and pretty simple.  I may do another one using "regular" fabrics some time.  I'm also not completely thrilled with the piano key borders but I've discovered I'm running low on border fabrics.
Kaleidoscope by Leila Boutique
My next plan is to dump out all the precut squares and see what I can come up with - there are likely 4 or 5 quilts in that box.  Certainly I can do a few trip around the world quilts, maybe some color diagonals too.  I'll need to add a few just to keep all the ABC's plus some background fabric, but I bet I can whittle it down pretty easily. Stay tuned.

Tuesday, April 2, 2019

A busy year and only 2 I spy quilts?

Wow, it's been over a year since I posted on this blog.  I only have 2 I spy quilts to show for it, one of which was actually started a long time ago, I just added a border and quilted it this year.  Hmm.  what have I been doing?  Well there have been a LOT of T-shirt quilts this year (see my other blog -  Dee B Tee's).  And I got a new long arm machine - oh it is wonderful - HQ Amara!  I am so happy with it.  Oh and I made this paper pieced monster - and given how much I feel obligated to finish things I had to see it through to the end.  Not quilted, it may not ever be quilted, but the top is done.
The pattern is called Empire Place.  I know it is NOT an I spy, but I spent a year of my life on this silly thing and it's not even hand pieced.  I have to show it.

I had 2 "baby occasions" this year.  For the first I spy quilt, I grabbed one top hanging in the closet and added a simple pieced inner border with a black outer order & abc binding.  This one went to a co-worker's 2nd child  - big brother has one of my quilts too.  


 The 2nd quilt was made for a new baby at my church.  Mom is a school teacher and dad loves cars, so I put in everything related I could find in my stash.  I've made the pattern before (from Missouri Quilts) and really enjoyed doing it, so decided to do another.  I used some left over binding that I found in my scrap bin.  I like the colors with the black borders

Not sure what this year holds.  Work has been exceptionally busy, but I do love hiding in my sewing room.  It is definitely time to spend some quality hours with my novelty fabrics.  I've missed them this year.

Saturday, February 17, 2018

Recent ideas from old notes

I am always on the lookout for I spy possibilities.  Any time I go to a quilt shop or a quilt show, while I'm enjoying the day I'm also looking for I spy ideas.  As I flip through a catalog I look for quilts that might work with novelty fabric.  As I'm browsing the internet, my eye is always peeled.  How do I keep track of what I find?  Well technology is a help.  If it's an electronic form, I take a snip then stick it in One Note, a nifty little app from microsoft that my daughter told me about.  The new Cloud version is very handy in that I can see it on my phone as well as my computer.  I also take pictures with my phone, which backs up to google photos (easy to pull them into a blog that way).  And if it's a catalog, I just tear the page out and throw it in a folder.
Then periodically when I'm trying to think what I'd like to work on next, I'll flip through one of these sources.  Sometimes the ideas may sit there for months or even years before I decide to make a quilt.  These 2 ideas have been in the box a couple of years and now they get to be quilts.

This particular idea was from a presentation made at least 3 years ago at a quilt retreat I go to each February.  Thank you lumberyard ladies.  I like it but boy did it take a long time to pull all those different fabrics.  I was worried at first that I might not have 96 different blank novelties - ha, I needn't have worried.  It needs a border but I think I'll wait until I know where it's going.

So from extremely BUSY, we now have very simple and dramatic.  This idea was from an old Connecting Threads book, though they used grey background and smaller blocks (these are 6" finished).  I like how graphic this turned out.

The idea for this "Zipper quilt" was from a friend on the delphi quilt forum I frequent.  She makes a lot of donation quilts and we have shared many ideas over the years.  This used up a lot of the left over 2x4 rectangles from fussy cutting.  I've done something similar without the sashing but I like this layout, and no matching corners, even better.


What to work on next, I need to go back to the idea pile and see what else interesting is in there.


Monday, January 15, 2018

A series of small unfortunate events....

My quilting friend Shelley suggested I share this on my blog. 

I referred to this quilt in my last post, the pattern is called Slide Show by Adkinson designs.  I pieced this quilt a couple of years ago then put it in my closet to wait for an occasion to gift it.  I have a couple of "occasions" coming up now so I was quilting 2 baby quilts and decided to quilt two others toddler size quilts just because everything was set up on my frame.  On a roll so to speak.  I decided to quilt this Slide Show quilt and put it on display instead of leaving it in the closet.  First of all, I couldn't back it with my usual fleece because the pattern/colors showed through the muslin sashing, so I used batting and some wide backing I had, not really kid themed but oh well.  Then I decided the muslin really needed white thread for the quilting.  Hmmm, I had a spool but it was getting low.  It would probably be enough if I used grey in the bobbin- of course it wasn't.  I was on THE LAST PASS when I ran out.  So rather than order another spool and wait, NOOOO I made due with some regular C&C from my stock.  It broke a couple of times (I thought) but it was only about 2 feet of quilting, I pushed through.  (mistake).  Binding, the binding from my stash I wanted to use of course wasn't long enough and the fabric was now gone.  I decided to make the faux flange.  It looks pretty spiffy but it is more work, but that's ok, I've already put significantly more work into this I spy quilt than I normally do.  Getting the little squares to line up took a lot of figuring and I had to add TOT to the side and bottom of each to get the math to work out.
As I was hand stitching the miters and the label, I noticed something odd.  That darn C&C is actually CUT in several places.  Somehow it cut but kept on stitching (?) so there are about 5 places where there are blank spaces in the quilting, actual breaks in the thread for 2 or 3 stitches.  Really????  Sigh.  OH well, I'll fix it before I gift it.  Darn it.  So Yesterday I decided to hang it in my sewing room, stepped back and noticed.  Hmm why is there 2 black blocks and 2 purple blocks right next to each other?  I would never do that on purpose?   And the TOT that I added to each block to get it to the right size is on the bottom and right of the top 3 rows but the top and left of the bottom 2 rows.  Sigh again.  I put the bottom 2 rows on upside down, flipped that section 180 degrees.  If only I had looked at the quilt before I quilted it, I could have fixed it pretty easily, but not now.  I know you will laugh, but it bothers me every time I look at it.  I have to find a kid to give this to.  But for now I guess I'll call this my OCD failure quilt or my humility quilt, there are so many little silly things wrong with it.  And I spent SOOOOO much extra time on it.  But the colors are pretty from a trotting horse....

I know you can't see the details from this picture, but standing in front of it....  just look away.

Saturday, January 13, 2018

Some that I've missed

Shortly after starting this blog, I realized I needed a way to keep track of the quilts I had already posted.  Given that I'm an accountant in my professional life, of course I set up an Excel file.  It's turned out pretty helpful in many ways.  I keep track of when the quilt was completed, the designer, the pattern, the recipient as well as the blog post and date.  I've not been good about keeping everything updated this last year, either my list, my binders or the blog.  So that was my project today, to get everything caught up.

I filtered my list on quilts I hadn't ever posted about and discovered a period of time I had missed completely.  So this post is to go back and post on some quilts I've missed showing in previous topics.

Several years ago I made a t-shirt quilt for a friend's granddaughter from her 1st year onsies.  It was a lot of fun figuring out how to get all the letters of the alphabet in the quilt. And I got to use up some of the random striped fabric I had been saving.


The mom loved it so much she wanted one for her 2nd daughter.  So this is both a t-shirt and an I spy quilt.  I used a FQ pack I had in my stash for the sashing and cornerstones which worked well because most of the onsie's were white.


This quilt was made for a co-worker who teased me for years that I had made everyone at work a quilt except her.  She collects Owls and her favorite color is purple, so I made her a purple Owl quilt.  And wouldn't you know, within a couple of months, she resigned.  The pattern is a modified version of  Chopsticks from B2B.


This pattern is based on Slideshow by Adkinson designs.  I do like many of their patterns, though this one took more time than I usually spend on an I spy.  I did have fun matching the colors on my precut squares and adding coordinating TOT to the blocks to the needed size.  There was a lot of math on this one to get the squares and muslin in the sashing to line up just right.  I think I may keep this one, especially after I used the faux piping binding.


 This was an original pattern requiring a little bit of partial piecing, but it went together very fast.  I used strip piecing on the blue/white sections.  I had fun using up scraps of spotted fabric.


I really like this pattern, called Chain Letter.  I've made it using batik noodles and decided to try an I spy version.  I think it turned out well.


 And look at the happy face!

Small Rearrangement - sewing room update

I've recently joined a group on FaceBook that shares sewing room organization ideas.  After seeing all these ideas and thinking about what I'd like to change in my own room, I decided to rearrange to see if I could improve.

One of the items on my "wish list" was that I frequently find myself wishing I could walk around my cutting table, instead of doing contortions or (worse yet) cutting in the wrong directions and in an unsafe manner.  I got to looking at how I was utilizing my quilt frame table.  I've used it for a pressing table for years, but could I put my cutting surface there also?  It would require doing something about the roller bars because they would prevent me from working on the other side.

And that's another thing on the wish list.  I had been trying to figure out a good way store the bars.  I tend to quilt in batches, primarily because I have to un-thread the machine when not in use because my cat eats the thread.  So I do use the frame table for lots of things other than just as a quilt frame, and moving the bars to the side helps, but then I worry about visitors damaging or bending them.

I asked my husband for ideas on how to suspect the bars under the table.  He suggested that I just re-arrange my Elfa baskets so that I could lay the bars across them.  No holes to drill, and it I change my mind, easy to un-do.  Brilliant (don't tell him I said that).

Another item on the list is my old Horn sewing cabinet.  It's just been taking up space under the quilt frame table.  If I need to use that machine, it was a major pain to pull it out, open the lid while negotiating the bars, and then try to squeeze my chair in to sew.

All of these came together by shuffling the cutting & sewing stations around. I moved the 3 basket sets that had been the cutting station, lining them up under the table with the one that was already there.  I left room in the middle for storing large rulers and extra cutting mats.  Man oh man, it feels so roomy now on this side!  And I can use either side for cutting and pressing.  Now to get in the habit, I keep forgetting I can use both sides.  My cutting station is  a piece of particle board with 2 cutting mats taped together, so moving it around is easy.  I already have two 1 x4  boards affixed to the table to protect the guide rails and they work great to keep the cutting surface suspended and away from the rails so they don't get damaged.


Here you can see the roller bars on top of the basket frames.  I'm very pleased with this solution.  It's pretty quick and easy to put the bars back on the frame, and they are well protected under the table.  There was even room to use the upright storage for paper rolls that had been packed away for a few years.


I moved my straight stitch machine to the side and put the portable table behind it to support quilts on the back.  Very handy when quilting or doing bindings but I may not leave it there.  You can see it to the left in this photo.  The shelf isn't as accessible but now it's really only for decoration, though the light is still handy.  The Horn sewing cabinet is now in front of the design wall and can be opened to use the zigzag machine when needed.  It also provides an extra surface to stack things.  When I am quilting, I can put the cutting surface there.  It still have to reach over it to use the design wall, but it is on rollers so I can move it fairly easily.


Here is the view from the other.  The baskets aren't really accessible from this side as I had to push them over far enough the other way to hold the roller bars.  I moved one of the antique crates from the side as it was in the way of the wheels and cogs on the ends of the bars.  It fits just right in the space still leaving room for my light table, an extra pressing station and a couple of large rulers.

There are still a few problems.  I keep stubbing my toes on the baskets when using the other side of the cutting table.  And I wish my design wall was more accessible.  I'm not convinced that I want to keep the Horn cabinet but I'm afraid I'll regret it if I sell it.  I could move the design wall to the wall where the pink quilt is now, but then I can't take pictures of finished quilts without the quilt frame table in the way.  But for now I like the arrangement.  And it only cost a couple of hours effort.  No new holes in the wall and no major moving of furniture.  Now to remember which baskets are where....  

Saturday, December 23, 2017

Tour of Dee's place - my sewing room

If you are a fan of Anne of Green Gables, you'll understand the reference in "Dee's place" - my daughter thinks it is perfect - and it is my refuge.


Please come in and take the tour:

Formerly the master bedroom, this is now my sewing room/guest room after a master suite addition a few yeas ago.  This view shows my main sewing table and an extra portable table on the side - it makes a good t-shaped area for paper piecing and can be easily folded up and put away if needed.  I also have a pressing table made from a TV table I can put on the other side.


I have the sewing tables on slider pads so I can move them out of the way easily. The sofa is a fold out bed for guests, though mostly my husband or daughter sit and visit with me.  When we need the bed, I have to pack away the extra table and move the rocker, but it isn't terribly tight. The rocking chair with the extra light is great for hand work (and Cat loves it for supervising).  The track lighting is wonderful - no shadows.  The design wall is made from foam boards from a home improvement store, covered in fleece and mounted using command strips.  I have since discovered that the fleece sags over time and I've had to reapply it once already.  At some point I'll replace it but at the time it was considerably cheaper than felt.  The curtain rod with clips I originally used to hold a felt backed table cloth for use as a design wall, but the ceiling fan would blow the pieces off and I liked the idea of being able to pin into the wall.  Now I use the curtain rod to hold finished quilts for photographing after I slide the tables out of the way.


This photo shows the book cases and cutting station made with Elfa wire baskets.  I've used these baskets in multiple arrangements over the years.  I love the flexibility as I always seem to be re-arranging.  I have a small cork board to pin misc. items and a small file folder tray for frequently used rulers.  The shallow baskets hold notions and other rulers and thread.


The cutting surface was a little low, so I added spacers made from a 4x4 length of lumber to raise the surface, which also provided some additional storage underneath.  At first I was going to attach them to the surface but everything is heavy enough it stays put well and it gives me the flexibility to move it around if needed.  I have used the 3 x 5 board as a drafting table by sitting it on my mid-arm table and grabbing my old t-square.  Love flexibility.  The shelf has a stick-on florescent to get rid of shadows while cutting and provides a great place for pencils and a scrap basket for trimmings.


Fabric is folded to consistent size to fit in the baskets.  I tried comic boards but didn't like the space they took up - I want it all for fabric.  I like that I can pull out a basket and take it over to the table to look through it.  And it is easy to push the stack over and insert more - some baskets are pretty full.  The thread is store in a utensil tray, with the ends secured to keep it save from Cat.

Cat Cover - also known as sewing machine cover


I have to keep my machine covered or else unthread it as my cat likes to eat thread.  He has had two expense trips to the vet to remove yards of thread from his intestines.  Not a good cat for a quilter, I know.  I cut the box to size and covered it with quilt themes wrapping paper.  I also can't leave my mid-arm threaded unless I chase the cat out and lock the door.  I keep my thread locked away, empty the trash after each session and frequently scan the floor for dropped threads.  Short pieces of thread aren't a problem, it's the long ones that are deadly.  Stupid cat.  But he loves to be in the room with me, supervising.  If I close the door, he sits and meows, sticks his paws under and makes a general pest of himself.


I purchased my mid-arm quilting machine and frame from a friend of a friend several years ago.   I love all the storage space under the table.  I've upgraded the rails, arms and roller bars, though some day I would like to get a faster machine.  I have a tendency to move too fast and the stitch regulator can't keep up.  I have a pressing board with removable cover, lightweight and easy to move.  I added spacer boards to the table to protect the table rails when I lay things across as I didn't want to damage the new rails.  I move the rollers over to the far side to give me easier access to the table until I am going to use the quilt machine.  I tend to quilt in batches since I have to be so careful of Cat.  I can't leave the machine threaded and if a quilt is loaded he will walk across it unless I lay foil over it, s once I start quilting, I can't easily leave it for long periods.  It's easier to just get it finished. 


I keep my older zigzag machine and serger in this cabinet and can pull it out when needed, though more often I get my portable machine out and use the table next to my straight-stitch machine.  I bought this cabinet when I was garment and home dec. sewing, but it takes up a lot of space and the storage isn't what I need now, so it mostly is stored away.   It's a great cabinet, just not really what works for me any more. 
View of my closet.  I have a fold away cutting table that I don't use much now.  At one time my sewing area was in a corner of my kitchen so it was helpful to be able to fold it up small.  I still sometimes pull it out into the bathroom area if I need a large cutting surface but it is a tight squeeze.  The labeled boxes store notions, fabric strips, other craft supplies.  
Here is the other side of the closet where I have hanging storage and a file cabinet.  The cabinet holds papers, additional supplies and patterns.

I also have rolled backing and bolts in the corner by the files.  If I have more than a couple of yards of fabric, I prefer to put it on bolts so that it doesn't take up so much space in the baskets.

I know I am very fortunate to have such a great space to sew and quilt.  Thanks for visiting.